Timber must be protected from the elements, mainly rain and the sun’s damaging UV rays. Proper waterproofing, sealing the timber on all sides, and maintenance are very important to make your backyard cabins and granny flats last for as long as you live, plus your children’s lifetime. These are important warranty conditions. Please find all other warranty conditions here.
Waterproofing
To protect the building from water damage, preserve the timber, or at least the bottom boards, with a CN (Copper Naphthenate) timber protective emulsion. Read instructions and watch a video on preserving the first layer of the structure. Sealed bottom boards will stop any moisture penetration that comes from the top of the flashing installed around the perimeter of the building.
Another important waterproofing point is the roofing. Make sure corrugated roofing is installed according to the roofing manufacturer’s instructions, with sufficient rain gutters and downpipes to dispose of rainwater.
After the assembly of timber parts is finished, cover your new building structure with the waterproof sheets, even if it is only for a night. Roofing must be put on as soon as possible to waterproof the building and avoid water damage to the timber.
Sealing the timber on all sides
It is critical to seal [paint or stain] the wood on all sides, inside and out, with quality permeable timber paints immediately or within 21 days of the assembly process being completed. This approach ensures that there is no moisture penetration while still allowing the timber to breathe and maintaining the integrity of the wood cell structure.
Natural timber cracks, holes need to be filled with timber fillers to get an even surface for a perfect finish. Also, any surface imperfections should be sanded and sharp edges rounded. Timber must be free of dust and grime to ensure proper paint adhesion. This will ensure better coverage of paint and protection. On average, the need for a maintenance coat will typically arise every 4-5 years, or possibly as often as every 1-2 years, depending on the timber’s exposure to the elements. Please refer to and follow the paint manufacturer’s instructions.
We strongly recommend watching the video and reading the tips and instructions below on how to seal the timber and what to pay particular attention to.
Architraves around doors and windows
Window/door architraves and fascia boards must be painted from both sides. It is usually done after construction by taking them off, sealing the back, and then re-fixing them. Following these 3 simple steps will extend the lifespan of the architraves:
- Unscrew the architraves
- Seal all timber surfaces and
- Screw them back on

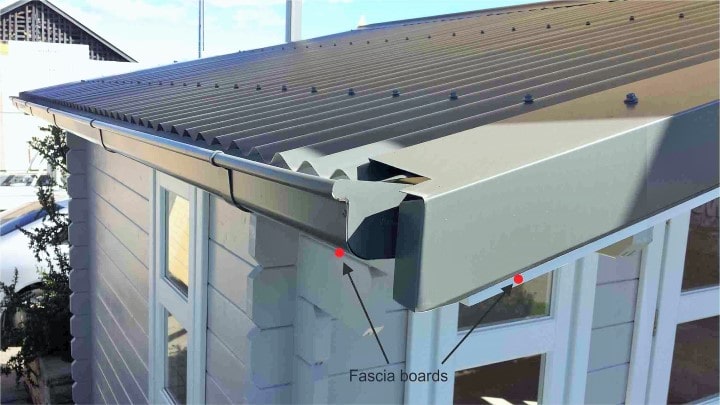
Fascia boards
The same process applies when we get to the fascia and timber boards around the roof line. Generally, the ones behind the gutters and the steel fascia/flashing that go on top of the timber fascia boards. If you install them unsealed, you’ll never be able to seal them after the roofing is installed. So, seal them on all faces with at least two coats—three is desirable—prior to fixing. And then that piece of componentry will outlast you and give you the service that you are looking for in this product. This is not to be missed before installation. Seal all timber surfaces of fascia boards before installation.
Walls
That same principle applies to the walls. The walls must be sealed from both sides prior to or, in most cases, after the installation.
Pay particular attention to the end grain here, because that is the number one source of moisture uptake in the walls. Even if those nibs are going to be covered with timber C-section covers, we strongly recommend the end grain is sealed with at least three coats of suitable product prior to the covers going on. And that will minimize any checking and any moisture uptake. Do it as soon as possible, because the timbers supplied are kiln-dried from the factory, so the trick is to seal it and keep the moisture out. That can even be done on the same day as construction. Don’t wait.
Murray Fleming, the builder

And remember to seal and waterproof the bottom of the first layer of wallboards prior to it being fixed to the steel or timber subfloor or the concrete.
Choosing the right exterior wood finish for Australian conditions
Exterior timber features play a significant role in the aesthetics and functionality of many Australian homes and commercial buildings. However, maintaining their beauty and durability in the face of our harsh Australian climate can be a challenging task. In this guide, we’ll explore the key factors to consider when choosing the right exterior wood finish to protect the timber.
Water repellency is paramount
The primary requirement of any exterior wood finish is to repel water effectively. Timber’s ability to absorb water can lead to swelling, warping, cracking, and rotting over time. To combat this, many decades of research have gone into creating products that not only repel water but also minimize the labor required for maintenance.
The dilemma of film-forming finishes
One approach to achieving water repellency is to apply a finish that creates a protective film over the timber. While this can be effective initially, it poses a challenge in the long run. As the Australian sun heats the timber, it undergoes expansion and contraction. Most film-forming finishes eventually crack or peel because the film becomes rigid and cannot adapt to these natural movements. Water can penetrate through these cracks, leading to the breakdown of the finish.
Renewing a deteriorated film-forming finish typically involves a labor-intensive process of stripping or sanding, making it a daunting task. As a result, many manufacturers of exterior timber finishes have shifted towards producing penetrating finishes, which can expand and contract with the timber without cracking or peeling.
Breathable coating systems: definition, benefits, and examples
Breathable coating systems, also known as penetrating finish sealants, are paints or stains that allow moisture vapor to pass through them. This is in contrast to conventional paints or stains, which can trap moisture vapor, leading to problems such as mold growth and peeling paint. Breathable paints are particularly important for use on homes and other buildings with walls made of porous materials such as brick, stone, and timber. These materials need to be able to breathe in order to prevent moisture from building up inside the walls.
Penetrating finishes offer water repellency without the drawbacks of film-forming finishes. They do not crack or peel and can adapt to the natural movements of the timber. However, they have a shorter lifespan compared to film-forming finishes and require regular maintenance.
To maintain the effectiveness of a penetrating finish, periodic top-up coats are necessary. The frequency of these top-ups depends on the quality of the finish and the level of exposure to the elements. For instance, decks in full exposure to sun and rain may require an annual top-up coat, while vertical timber features or those under a roof could last 4 to 5 years before needing maintenance. Keep an eye on your timber; when it stops repelling water effectively, it’s time for a top-up coat.
Preserving timber’s natural colour
In addition to water repellency, many exterior timber finishes include special micronized tints that block the sun’s UV rays, preventing the timber from greying over time. These tints come in various shades, from light honey colours to more intense hues. Generally, the stronger the tint, the more protective and long-lasting the finish will be.
However, be aware that these tints can accumulate on the surface of the timber over time, potentially altering its natural appearance. To avoid this, it’s advisable to clean the timber thoroughly with a quality timber cleaner before applying a maintenance coat. This step removes any surface buildup of tints and helps preserve the timber’s original look and feel.
In conclusion, choosing the right exterior wood finish for your Australian timber is a balance between water repellency, longevity, and colour preservation. Consider the level of exposure and quality of the finish to determine the maintenance schedule that best suits your needs. With proper care, your exterior timber features can withstand the challenges of the Australian climate and continue to enhance the beauty of your property for years to come.
Choosing the right interior finish for spruce timber walls
Spruce timber is a versatile and popular choice for mass timber construction, such as cross-laminated timber (CLT) and glulam timber (LGL) walls. It is known for its strength, durability, and ease of workability. However, spruce is also a relatively soft wood, so it is important to choose the right finish to protect it from scratches, dents, and other damage.
There are many different types of wood finishes available, each with its own unique properties and benefits. When choosing a finish for spruce timber walls, it is important to consider the following factors:
- Protection: The finish should provide adequate protection for the wood against everyday wear and tear, as well as moisture and pests.
- Appearance: The finish should enhance the natural beauty of the wood, while also achieving the desired look and feel.
- Durability: The finish should be durable enough to withstand repeated use and cleaning.
- VOC content: VOCs, or volatile organic compounds, are harmful chemicals that can be released into the air when certain finishes are applied. It is important to choose a finish with a low VOC content to protect your health and the environment.
- Breathability: A breathable finish will allow the wood to naturally expand and contract as the humidity changes, helping to prevent cracking and warping.
Types of Wood Finishes
The most common types of wood finishes include:
- Oils: Oils, such as tung oil, linseed oil, and Danish oil, penetrate the wood and provide a natural, protective finish. Oils are a good choice for spruce timber walls because they enhance the wood’s grain and colour.
- Varnishes: Varnishes create a hard, protective coating on the surface of the wood. Varnishes are a good choice for spruce timber walls if you need a durable finish that is resistant to scratches and dents.
- Polyurethanes: Polyurethanes are similar to varnishes, but they offer even greater durability and protection. Polyurethanes are a good choice for spruce timber walls if you need a finish that can withstand heavy traffic or exposure to moisture.
Recommendations for Spruce Timber Walls
For spruce timber walls, we recommend using a low VOC, breathable finish such as tung oil, Danish oil, or a water-based polyurethane. These finishes will provide the wood with the protection it needs without obscuring its natural beauty.
Application
Once you have chosen the right finish for your spruce timber walls, be sure to follow the manufacturer’s instructions carefully for application. It is important to sand the wood properly and to apply the finish in a thin, even coat.
Additional Considerations for Mass Timber Construction
When choosing a wood finish for mass timber walls, it is important to consider the specific needs of your project. For example, if the walls will be exposed to high levels of moisture, you will need to choose a finish that is specifically designed for wet areas. Additionally, if the walls will be in a high-traffic area, you will need to choose a finish that is durable and resistant to wear and tear.
- Use a paint that is suitable for porous materials. These paints are typically more breathable and flexible than traditional paints, which can help to reduce the risk of peeling and cracking.
- Avoid painting mass timber walls in direct sunlight. This can cause the paint to dry too quickly and lead to problems such as cracking and peeling.
- If you are painting mass timber walls in a humid environment, be sure to use a paint that is resistant to mold and mildew.
We recommend consulting with a qualified wood finishing professional to get specific recommendations for your project.
Go back to: Builder’s Guide
Go back to: Terms and conditions of sale